Doing perturbation error growth tests
Doing perturbation error growth tests is a way to validate a port of the model to a new machine or to verify that changes are only roundoff. The steps are the same in either case, but in the discussion below I will assume you are doing a port validation to a new machine (but in parentheses I will put a reminder that it could also be for code-mods). The basic idea is to run a case on the trusted machine (trusted code) and another with initial conditions perturbed by roundoff and compare the results of the two. The difference between these two simulations (the error) will grow over time and describe a curve that we compare with the error growth on the new machine (code changes). The error growth on the new machine is the difference between the non-perturbed state on the trusted machine and the non-perturbed state on the new machine (code changes). If the new machine (code changes) are well-behaved the plot of this error growth compared to the error growth curve on the trusted machine should be similar. If the changes are NOT well-behaved the changes from the new machine (code changes) will be larger than the perturbation changes. In summary the simulations and steps that need to be performed are:
Run a simulation with the trusted code on the trusted machine. (optionally you can use a dataset from inputdata repository).
Run a simulation with the trusted code on the trusted machine with initial conditions perturbed by roundoff (using a namelist item to do so). (this is optional is you are using inputdata repository datasets)
Run a simulation with the new code on the non-trusted machine (code changes).
Do a plot of the RMS difference of history variables between simulation 1 and simulation 2.
Do a plot of the RMS difference of history variables between simulation 1 and simulation 3.
Compare the two plots in steps 4 and 5.
If the plots compare well the new machine (code changes) is running as well as the trusted machine.
If the plots do NOTcompare well the new machine is NOTrunning as well as the trusted machine. Typically the recommendation here is to lower the optimization level on the new machine and try again (or in the case of code changes, modify or simplify the code changes to get something that should be closer).
The history variables we have used to do this is either 'TSOI', and/or 'TSA'. 'TSOI' are the 3D snow and soil temperatures for vegetated land-units. If there is a change in soil physics it should show up in this field (and it should show up even for something that is at a pretty deep soil depth). However, as 'TSOI' is only for vegetated land-units, changes in lake or urban land-units -- will NOT show up. 'TSA' by contrast is the 2m surface temperature across all land-units, so changes in urban or lake land-units will show up. However, changes in deep soil physics will only show up as it propagates to the surface. So one field may show something that the other doesn't. In the examples, we use 'TSOI', but 'TSA' can be used as well. And in most cases you should check both.
Using Perturbation Error Growth Analysis to Verify a Port to a New Machine
Running non-perturbed on trusted machine
The first step is to run a non-perturbed case on the trusted machine. You need to run all of the steps with the same compset and same resolution. For these examples we will use 2-degree resolution with the ICN compset for 2000 conditions. You need to run for three days with a cold-start.
Note: As we describe below, This is optional if you will be using datasets from the inputdata repository to take place of this step.
Example 4-10. Example non-perturbed error growth simulation
> cd scripts > ./create_newcase -case trustedMachinePergro0 -compset ICN -res f19_g16 \ -mach bluefire > cd trustedMachinePergro0 # Set the non-perturbed PERGRO use-case > ./xmlchange -file env_conf.xml -id CLM_NML_USE_CASE -val pergro0_pd # Set coldstart on so arbitrary initial conditions will be used > ./xmlchange -file env_conf.xml -id CLM_FORCE_COLDSTART -val on > ./xmlchange -file env_conf.xml -id RUN_TYPE -val startup # Set PERGRO on in the configure > ./xmlchange -file env_conf.xml -id
CLM_CONFIG_OPTS-val "-pergro on" -append # Now configure and build > ./configure -case > ./trustedMachinePergro0.bluefire.build # Set it to run for three days and turn archiving off > ./xmlchange -file env_run.xml -id STOP_N -val 3 > ./xmlchange -file env_run.xml -id DOUT_S -val FALSE # Run the case and then you will save the history file output for later use > ./trustedMachinePergro0.bluefire.submitNote: If you aren't able to do this step, as you don't have access to a trusted machine, you can use datasets that are available from the svn inputdata repository to take place of running it yourself. The disadvantage is that this is only done for certain model versions and for exactly the configuration/namelist given here. You won't be able to test it for your own custom code or configurations.
Running perturbed on the trusted machine
The next step is to run a perturbed case on the trusted machine.
Example 4-11. Example perturbed error growth simulation
> cd scripts > ./create_newcase -case trustedMachinePergroRnd -compset ICN -res f19_g16 \ -mach bluefire > cd trustedMachinePergroRnd # Set the perturbed PERGRO use-case > ./xmlchange -file env_conf.xml -id CLM_NML_USE_CASE -val pergro_pd # Set coldstart on so arbitrary initial conditions will be used > ./xmlchange -file env_conf.xml -id RUN_TYPE -val startup > ./xmlchange -file env_conf.xml -id CLM_FORCE_COLDSTART -val on # Set PERGRO on in the configure > ./xmlchange -file env_conf.xml -id
CLM_CONFIG_OPTS-val "-pergro on" -append # Now configure and build > ./configure -case > ./trustedMachinePergroRnd.bluefire.build # Set it to run for three days and turn archiving off > ./xmlchange -file env_run.xml -id STOP_N -val 3 > ./xmlchange -file env_run.xml -id DOUT_S -val FALSE # Run the case and then you will save the history file output for later use > ./trustedMachinePergroRnd.bluefire.submitNote: If you aren't able to do this step, as you don't have access to a trusted machine, you can use datasets that are available from the svn inputdata repository to take place of running it yourself. The disadvantage is that this is only done for certain model versions and for exactly the configuration/namelist given here. You won't be able to test it for your own custom code or configurations.
Running non-perturbed on the new machine
The next step is to run a non-perturbed case on the new machine. Here we will demonstrate using the machine intrepid. For the previous two steps you have the option of using datasets provided in the subversion inputdata repository to take their place -- however this step is required.
> cd scripts > ./create_newcase -case newMachinePergro0 -compset ICN -res f19_g16 \ -mach intrepid > cd newMachinePergro0 # Set the non-perturbed PERGRO use-case > ./xmlchange -file env_conf.xml -id CLM_NML_USE_CASE -val pergro0_pd > ./xmlchange -file env_conf.xml -id CLM_FORCE_COLDSTART -val on > ./xmlchange -file env_conf.xml -id RUN_TYPE -val startup # Set PERGRO on in the configure > ./xmlchange -file env_conf.xml -id
CLM_CONFIG_OPTS-val "-pergro on" -append # Now configure and build > ./configure -case > ./newMachinePergro0.intrepid.build # Set it to run for three days and turn archiving off > ./xmlchange -file env_run.xml -id STOP_N -val 3 > ./xmlchange -file env_run.xml -id DOUT_S -val FALSE # Run the case and then you will save the history file output for later use > ./newMachinePergro0.intrepid.submitPlotting the differences
You can use the cprnc program to compute root mean square differences between the relevant history files. See the Section called Using the cprnc tool to compare two history files in Chapter 2 for more information on it and how to build it. On many platforms you will need to set some environment variables in order to complete the build (see the Section called Common environment variables and options used in building the FORTRAN tools in Chapter 2 for more information on building the tools).
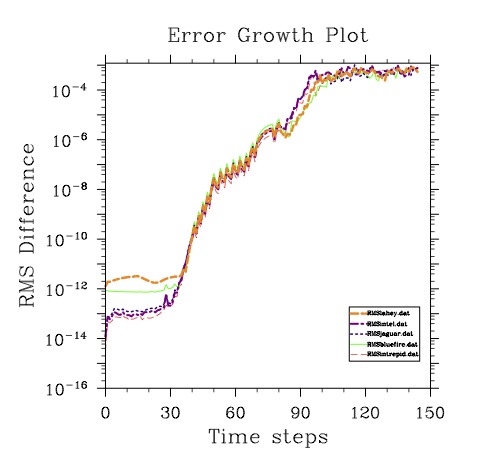
Here is a sample plot for several trusted machines: bluefire, intrepid, jaguar, and edinburgh (with both the lahey and intel compilers). The green line is the error growth for bluefire, the red is the error growth for intrepid, the dashed navy is for jaguar, the dashed maroon is for the intel compiler on edinburgh, and the thick dashed goldenrod line is for edinburgh with the lahey compiler. Note, the data for this plot is in models/lnd/clm/tools/ncl_scripts the files are named: according to the legend. Note, that the lines tend to cluster together and follow quite closely to the bluefire line which is our main trusted machine.# Build the cprnc program > cd models/lnd/clm/tools/cprnc > gmake # Now go to your case directory and run cprnc on the trusted-machine with and without # perturbation > cd ../../../../../scripts/trustedMachinePergro0 > ../../models/lnd/clm/tools/cprnc/cprnc trustedMachinePergro0.clm2.h0.001-01-01.00000.nc \ ../trustedMachinePergroRnd/trustedMachinePergroRnd.clm2.h0.001-01-01.00000.nc > trustedPergro.log # Copy the history file from the new machine to here # # And now run cprnc on the trusted-machine and the new machine both without perturbation > ../../models/lnd/clm/tools/cprnc/cprnc trustedMachinePergro0.clm2.h0.001-01-01.00000.nc \ ../newMachinePergro0/newMachinePergro0.clm2.h0.001-01-01.00000.nc > newPergro.log # Now extract out the RMS differences of TSOI for both # You may want to extract out the RMS differences for TSA as well # Changes in urban or lake land-units won't be detected with TSOI > grep "RMS TSOI" trustedPergro.log | awk '{print $3}' > RMStrusted.dat > grep "RMS TSOI" newPergro.log | awk '{print $3}' > RMSnewmachine.dat # And plot the two curves up to your screen > env TYPE=x11 RMSDAT=RMSnewmachine.dat RMSDAT2=RMStrusted.dat ncl \ ../../models/lnd/clm/tools/ncl_scripts/pergroPlot.nclWhen you do NOT have access to a trusted machine you can use the trusted file from bluefire that is available on the inputdata repository.
# Build the cprnc program
> cd models/lnd/clm/tools/cprnc
> gmake
# Get the unperturbed file from the subversion repository
> cd ../../../../../scripts/newMachinePergro0
> set dir = "lnd/clm2/pergrodata"
> set file = bluefirePergro0.ICN.0001-01-01_1.9x2.5_gx1v6_simyr2000_clm4-cesm1_0_3.c110617.nc
> echo "trustedfile = DIN_LOC_ROOT/$dir/$file" > clm.input_data_list
> ../ccsm_utils/Tools/check_input_data -datalistdir . -export -inputdata $DIN_LOC_ROOT
# And now run cprnc on the bluefire file and the new machine both without perturbation
> ../../models/lnd/clm/tools/cprnc/cprnc $file \
../newMachinePergro0/newMachinePergro0.clm2.h0.001-01-01.00000.nc > newPergro.log
# Now extract out the RMS difference
# You may want to extract out the RMS differences for TSA as well
# Changes in urban or lake land-units won't be detected with TSOI
> grep "RMS TSOI" newPergro.log     | awk '{print $3}' > RMSnewmachine.dat
# And plot the new curve versus the trusted curve up to your screen
> env TYPE=x11 RMSDAT=RMSnewmachine.dat \
RMSDAT2=../../models/lnd/clm/tools/ncl_scripts/RMSbluefire.dat  \
../../models/lnd/clm/tools/ncl_scripts/pergroPlot.ncl
In the figure below we now show example of curves for changes that are larger than roundoff. Once again the green curve is the trusted error growth from bluefire. The other curves are for changes that may be fairly small, but are larger than roundoff. The goldenrod curve is for using the 1850, and the navy is for using the 1999 Nitrogen deposition files rather than for year 2000. The red is for using the 1850 aerosol dataset rather than 2000, and the maroon is for adding the snow combination bug in. The differences in changes that are greater than roundoff is that the curves climb very steeply to the 10-6 value and then level off, while the curve for bluefire climbs much more slowly and gradually. The curves also don't mimic each other in any way, like the trusted machine plots do.